
Dynamic allocation of GPU render device in Proxmox
Implementing dynamic allocation of a render device for a GPU can be difficult. For some devices, such as an nvidia gpu, this may be easier, as this should create a device at /dev/nvidia0. However for integrated graphics this may not be the case.
The problem I encountered was that, to facilitate a video platform (such as Plex or Jellyfin) you have to passthrough a render device to a LXC. However, after a restart the GPU render device would switch from location, as the server also contains an iGPU.
Prerequisites:
- Blacklisted drivers of render device
- GRUB configured
- GPU drivers configured
In order to dynamically allocate our render device, we first need to know which device we want to use. For this we use udevadm. But first, we want to know the available devices, by using:
ls -l /dev/driYou should get a list of devices which are available. If you have only one render device and no GPU, it is probably integrated graphics. If you have multiple devices, you should look which one is the on you want to use. For this, you will have to look at the details of this command (may have to change the renderD128 to renderD129 to try searching for the correct device).
udevadm info /dev/dri/renderD128Of the list of details you get, you should look at a GPU reference, such as ”S: nvidiagpu’. Take a note of the text in the line of the format: dri/by-path/pci-0000… and add /dev in front of this line, so that you get: /dev/dri/by-path/pci-0000… If you do not see this reference and had multiple devices, try the other one.
The next step is to prepare the rules for creating the symlink. In the directory /etc/udev/rules.d make a new file, such as 99-custom.rules, by for example using nano:
nano /etc/udev/rules.d/99-custom.rulesIn this file, add the following text for creating the udev-rule, note that you should fill in your own pci-address in the env[id_path] variable. The symlink text is the name that will be created at /dev:
SUBSYSTEM=="drm", ENV{ID_PATH}=="pci-0000:00:02.0", SYMLINK+="nvidiagpu"Now that we have the rule of the device we want to dynamically connect to, we can activate the symlink by using udevadm. The syntax of this command need to be done correctly, by negating special characters. In the case of pci-000:00:02.0 it is:
udevadm trigger --verbose --action=add /sys/devices/pci0000:00/0000\:00\:02.0Now we should restart udev and reload the rules:
systemctl restart systemd-udevd
udevadm control --reload-rules
The directory /dev/nvidiagpu should now exist if everything was done correctly.
Now we can use the following command in a lxc to use this device, for example in jellyfin. This will bind the /dev/nvidiagpu directory on the host to the internal /dev/dri/renderD128 directory of the virtual machine.
lxc.mount.entry: /dev/nvidiagpu dev/dri/renderD128 none bind,optional,create=file,mode=0777
lxc.mount.entry: /dev/nvidiagpu dev/dri/card0 none bind,optional,create=file,mode=0777
If everything went correctly, the device should now have a render device available, which should be recognized by the machine. Even when restarting, the location of the render device will always be the same and the machine should not have a problem. If you want to also add your internal graphics, you can follow the same steps and add another line to the rules.
Extra: Installing nvidia GPU drivers
In order for having the render device work correctly, you will need the nvidia drivers at both the host and the container.
First, at the host we will have to blacklist the drivers, since we want to use our own drivers of nvidia, which work way better.
nano /etc/modprobe.d/blacklist.confWith contents:
blacklist nouveau
blacklist nvidia*
And now reload this in the system, using:
update-initramfs -u
reboot
Now we can begin to install the driver on our host. If you do not have the build package, you will first need to install it, using:
apt install build-essentials
Now download the drivers of your specific nvidia videocard on their website. Choose your model, choose the linux-64 OS and press search. Now click on the download button, since this is not yet the real download location. Now a button with Agree & Download should show up. Copy the url this button is linking to by using right mouse button and switch to the host shell. Now we can download the driver to the host using the following command, you should replace the right url with your own driver:
wget https://us.download.nvidia.com/XFree86/Linux-x86_64/550.90.07/NVIDIA-Linux-x86_64-550.90.07.runNow that we have downloaded the file, we must make it executable and run it:
chmod +x NVIDIA-Linux-x86_64-550.90.07.run
./NVIDIA-Linux-x86_64-550.90.07.run
You should be greeted with a UI in the shell. For any option just choose no, unless you want some specific functionality. Now the driver should be installed, which you can check by using:
nvidia-smi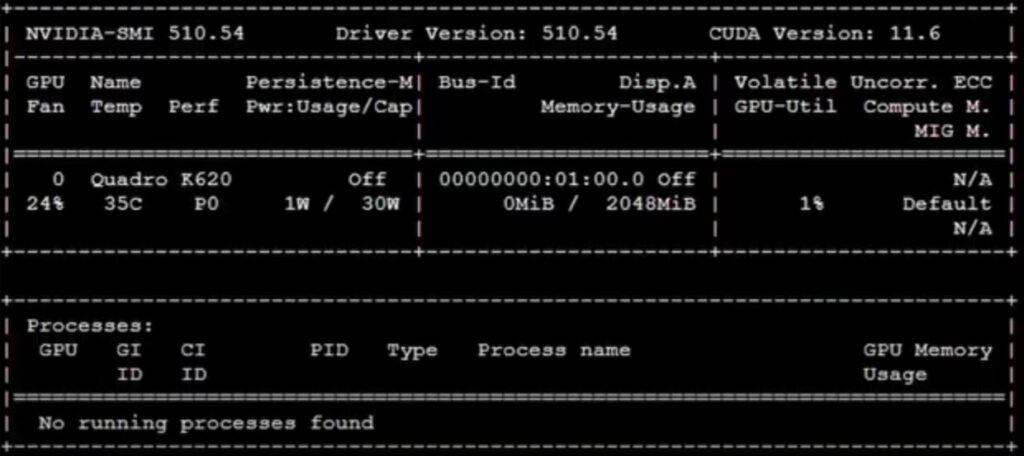
This should show a table with the versions, degree and usage. Now we want to make sure that the drivers load on every boot of our proxmox system. In order to do this, we will use edit the file:
nano /etc/modules-load.d/modules.confWith the content:
nvidia
nvidia-modeset
nvidia_uvm
And update the system state again, by using:
update-initiramfs -uSometimes the drivers are not correctly applied, which can be solved by explicitly stating rules:
nano /etc/udev/rules.d/70-nvidia.rulesWith content:
KERNEL=="nvidia", RUN+="/bin/bash -c '/usr/bin/nvidia-smi -L && /bin/chmod 666 /dev/nvidia*'"
KERNEL=="nvidia_modeset", RUN+="/bin/bash -c '/usr/bin/nvidia-modprobe -c0 -m && /bin/chmod 666 /dev/nvidia-modeset*'"
KERNEL=="nvidia_uvm", RUN+="/bin/bash -c '/usr/bin/nvidia-modprobe -c0 -u && /bin/chmod 666 /dev/nvidia-uvm*'"
Now that our host is prepared, we can continue to our container. This container will, in privileged mode need some binding. If you only want rendering capability, you can just use the above dynamic files, otherwise use ls -l /dev/nv* to find the GPU capabilities and note their ids, and allow and pass them through in the container lxc file, at /etc/pve/lxc:
lxc.cgroup2.devices.allow = c 195:0 rw
lxc.cgroup2.devices.allow = c 195:255 rw
lxc.cgroup2.devices.allow = c 195:254 rw
lxc.cgroup2.devices.allow = c 509:0 rw
lxc.cgroup2.devices.allow = c 509:1 rw
lxc.cgroup2.devices.allow = c 10:144 rw

lxc.mount.entry = /dev/nvidia0 dev/nvidia0 none bind,optional,create=file
lxc.mount.entry = /dev/nvidiactl dev/nvidiactl none bind,optional,create=file
lxc.mount.entry = /dev/nvidia-modeset dev/nvidia-modeset none bind,optional,create=file
lxc.mount.entry = /dev/nvidia-uvm dev/nvidia-uvm none bind,optional,create=file
lxc.mount.entry = /dev/nvidia-uvm-tools dev/nvidia-uvm-tools none bind,optional,create=file
lxc.mount.entry = /dev/nvram dev/nvram none bind,optional,create=file
You can now boot the container. Before we can use the drivers in this container, we should again download the driver using the wget command as above, but now in our container shell. After this is downloaded, run it by using:
./NVIDIA-Linux-x86_64-550.90.07.run --no-kernel-moduleThis prevents the driver from utilizing the kernel module, which we already have activate at host-level. Now we should have access to the GPU, which you can confirm by running:
nvidia-smi