Quick and easy guide: Google coral in frigate with docker and proxmox in 7 steps
Goal of the project
In this project we will try to run object detection with a m.2 A+E google coral, in a proxmox system running a lxc-docker with frigate. In order to make this working, we will:
Content
Before we begin
Sometimes I may refer to use ‘host’ for an action. This refers to typing a command in the shell at your PVE node. This can be found in the list at your pve-node, which should be under Datacenter. Another thing to note is that you should make sure secure boot is disabled if you have MSI-X, which you can verify with:
lspci -vv | grep MSI-XObtaining and installing the google coral
For this project I will be using the m.2 PCIe version of the google coral, with the A+E key. The availability of this item is better than the usb version, but may be more difficult to install. You can for example search on okdo to buy one. Note that for placement in an usual motherboard, it may not fit by default. If your computer has a bluetooth+wifi m.2 slot, it is probably the same A+E slot and may fit. However, if you do not have this slot, you can also use the B+M slot, which fits in most motherboards. For this you will need an adapter, which you can find for example on aliexpress.com.
If you have many cameras and think one coral will not be sufficient, you can also look at the dual-edgetpu this is the same coral, but with two TPU’s, for more processing power. Note that this does not always work with every motherboard. The second TPU may not be detected. In order to be sure that they are both detected, you will need a specific adapter that is designed to detect both TPU’s, which is made by makerfabs.
Now that you have got the correct coral and adapter, you can place the coral in your adapter, and use the screws to tighten it. Place the adapter with the coral in a m.2-slot on your motherboard. If the 2280 adapter is too long, you can cut it to 2260, since there are no connectors on this part.
Install and verify Coral drivers
You can first try to install the Coral drivers on your host using the official manual, but i could not get this working.
Instead, i used the following commands to build the driver myself. Using these commands you will install the required packages needed to build the debian package, retrieve the build materials from github for the driver and finally build and install it:
apt remove gasket-dkms -y
apt install git devscripts dh-dkms build-essential debhelper -y
cd /home
git clone https://github.com/google/gasket-driver.git
cd gasket-driver/
debuild -us -uc -tc -b
cd ..
apt install pve-headers -y
dpkg -i gasket-dkms_1.0-18_all.deb
apt update && apt upgrade -y
reboot
After you run these commands in the shell of your host, you should have succesfully installed the drivers for the coral. If you did not use the official manual, you will still have to execute the following commands after the reboot:
sh -c "echo 'SUBSYSTEM==\"apex\", MODE=\"0660\", GROUP=\"apex\"' >> /etc/udev/rules.d/65-apex.rules"
groupadd apex
adduser $USER apex
After this the newly created device /dev/apex_0 (and apex_1 with dual TPU) should have been created and owned by the apex user. Make sure this is the case by running:
ls -la /dev | grep apexWhich should have a result with apex, apex, 120 and the apex devices.
Confirm installation
Now that the coral drivers are installed, we can confirm that the coral is properly detected. For this we will use the following command:
lspci -nn | grep 089aYou should get a message like
02:00.0 System peripheral [0880]: Global Unichip Corp. Coral Edge TPUOr two lines if you have the dual-edge-tpu.
Install docker LXC with portainer
To install the docker LXC we will use proxmox helper scripts. Go to this website and search for docker and copy the line at the bottom of the page. Go to your host system and paste this line in the shell. It wil guide you through various steps. I recommend using the advanced settings. You can navigate the options using the space bar as select, arrow keys to move and enter to confirm. Now choose the following settings:
- Debian
- Version 12
- Unprivileged
All the other options you can just continue, or if you want a static IP you should enter an IP/CIDR address at the IPv4 CIDR Address step. This could for example be 192.168.0.4/24. This way the container will always stay on the same place in the network, which makes it easier to find.
After it is installed it will prompt you to install portainer. Choose yes and let it configure portainer. After it is done it will be available at your ip address and port 9443. In the case of our example IP address this would be: https://192.168.0.4:9443.
If you also want to configure a firewall and restrict the ports of the machine, you can look at my Proxmox Firewall Guide.
Configure ID-mapping
Since we are using an unprivileged container, we will have to configure our IDs. For this step you have to make sure the apex user is created correctly and active.
First, we will add our user to the subgid and subuid file. Add the following to both /etc/subgid and /etc/subuid, with for example nano (nano /etc/subgid):
root:1000:1
root:100000:65536
apex:165536:65536
If you also want to use video and render device later on, you should also add your own video and render IDs to both places, for example 44 and 104:
root:44:1
root:104:1
Now we are ready to also add the ID-mapping to our container to use and use our coral and an optional render device, add using nano /etc/pve/lxc/%containerid%.conf with your own containerid:
lxc.cgroup2.devices.allow: c 226:* rwm
lxc.mount.entry: /dev/dri/card0 dev/dri/card0 none bind,optional,create=file,mode=0666
lxc.mount.entry: /dev/dri/renderD128 dev/dri/renderD128 none bind,optional,create=file
lxc.mount.entry: /dev/apex_0 dev/apex_0 none bind,optional,create=file
lxc.idmap: u 0 100000 1000
lxc.idmap: g 0 100000 1000
lxc.idmap: u 1000 1000 1
lxc.idmap: g 1000 1000 1
lxc.idmap: u 1001 101001 64535
lxc.idmap: g 1001 101001 64535
lxc.cgroup2.devices.allow: c 120:* rwm
We should now be able to start our container, if all mapping went correctly.
Configure portainer instance
Now that our container is running, we can configure frigate in portainer. Go to your portainer instance at the url as shown before and create an account. After you configured the account you should be greeted with the homepage. Click on the local environment, then container and then add container. In this menu we can prepare our image for frigate. Since i will be using an nvidia transcoding videocard later on, i choose the image with tensorrt support: ghcr.io/blakeblackshear/frigate:stable-tensorrt. If you won’t use any videocard you can just omit the -tensorrt part.
We should now configure our container with the right settings, which can be overwhelming and specific to your use case. I will demonstrate my settings for my environment, you should think what is needed and not for your case.
I open the following ports, which you can add at the ‘manual network port publishing’ section:
| Purpose | Port | Protocol |
| RTMP | 1935 | TCP |
| RTSP feeds | 5000 | TCP |
| WebRTC over tcp | 8554-8555 | TCP |
| WebRTC over udp | 8555 | UDP |
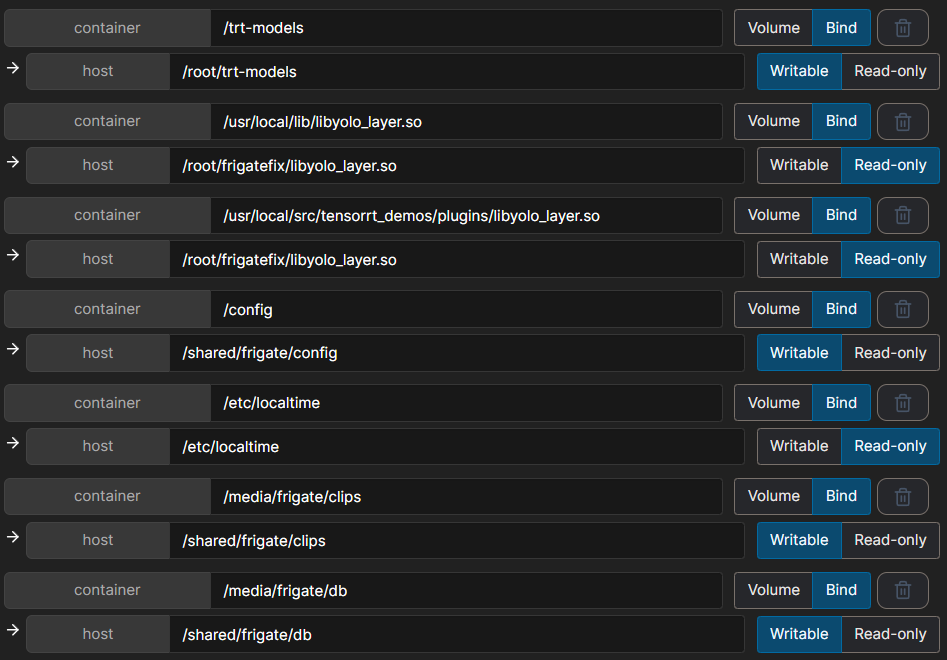
The volumes need to be at least the localtime, config and storage. You can add these at the Advanced container settings in the Volumes tab. However since I also experimented with using tensor I added some more volumes:
Another advantage of using portainer is the easy configuring of environment variables. Since you will add cameras to frigate, it is understandable that you will need passwords to enter. You may not want to enter these in plain text in the configuration of frigate. To prevent this you can use the environment variables to store this data. At the Env tab you can add a name, value pair for for example a RTSP password, MQTT credentials and timezone. The timezone name has to be TZ. The credential names can be anything you want, but you have to remember them to fill them later in the frigate configuration.
The next tab to setup is restart policy, which we set to always, in order to automatically restart the frigate instance on failure and after restarting.
The last important tab to configure is runtime & resources. At this we will use privileged mode, and add a new device:

If we want to use a GPU we should also enable the GPU here and choose the proper GPU in the dropdown. Also add all capabilities in order to make it accessible in the container.
Now that our configuration is done, we can deploy the container using the blue button. It should boot and be available at your ip address at port 5000, such as http://192.168.0.5:5000.
Configure frigate
In the previous step we prepared the environment variables which we can use in the configuration. You will need a camera as input and can use the environment variables we made in the portainer dashboard. You can add this in the frigate configuration by clicking on the config in the sidebar. An example configuration would be:
mqtt:
  host: 192.168.0.7
  port: 1883
  user: "{FRIGATE_MQTT_USER}"
  password: "{FRIGATE_MQTT_PASS}"
  topic_prefix: frigate

ui:
  live_mode: mse
  use_experimental: True

birdseye:
  enabled: false

ffmpeg:
  hwaccel_args: preset-nvidia-h264
  input_args: -avoid_negative_ts make_zero -fflags +genpts+discardcorrupt -rtsp_transport tcp -timeout 5000000 -use_wallclock_as_timestamps 1

motion:
  threshold: 55

detect:
  stationary:
    interval: 50
    threshold: 50
    max_frames:
      default: 3000
      objects:
        person: 1000
        car: 1000
  width: 1280
  height: 720
  enabled: true
  max_disappeared: 25

objects:
  track:
    - person
    - car

go2rtc:
  rtsp:
    username: "{FRIGATE_CAMERA_USER}"
    password: "{FRIGATE_CAMERA_PASS}"
  streams:
    camera_front:
      - rtsp://{FRIGATE_CAMERA_USER}:{FRIGATE_CAMERA_PASS}@192.168.0.6:88/videoMain

detectors:
  coral:
    type: edgetpu
    device: pci

snapshots:
  enabled: true
  bounding_box: true

cameras:
  front:
    ffmpeg:
      inputs:
        - path: rtsp://admin:{FRIGATE_CAMERA_PASS}@127.0.0.1:8554/camera_front_sub
          input_args: preset-rtsp-restream
          roles:
            - detect
    live:
      stream_name: camera_front

rtmp:
  enabled: False
As you can see, there are many things to configure. You can choose to enable mqtt which can pass the events to HomeAssistant. You can also enable the experimental UI which works better in my opinion. You can also use a birdeye view to have a overview of multiple cameras. In this configuration i also enabled ffmpeg using nvidia hardware acceleration, which you should remove if you do not have a nvidia GPU. Other things to configure are detection setting such as the handling of stationary items and the resolution it is done at. You can also configure the various objects to track. I also configured go2rtc in this instance which supplies a local processing of the camera streams.
Finally the most important step is the detectors, note that I added the coral device here, which enables the processing of the object detection to be distributed to the coral.
After you configured your configuration to your liking, You can press the save button, which will check the syntax for any mistakes. Carefully check your syntax, look at the frigate documentation to figure out any disturbances. If everything is fine press save & restart.
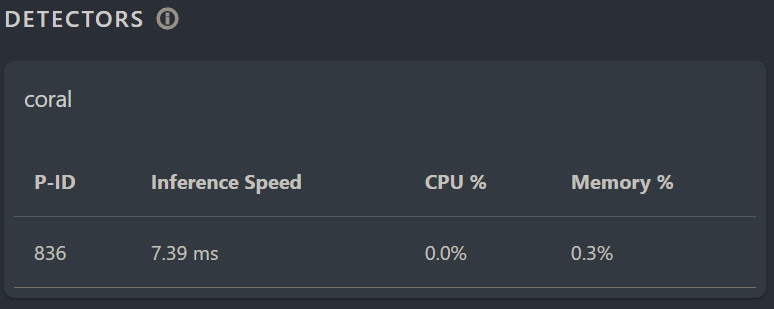
If everything went correctly, you should now see camera footage. If you press the system button at the left menu-bar, you should see the coral in action:
Extra: Videocard usage for encoding
In order to use a videocard with frigate, you will have to install the proper drivers. For convenience, it is recommended to mount the GPU dynamically. After you have done this and installed the drivers correctly, you should be able to access the nvidia-smi command in the container. If you added the ffmpeg to the frigate configuration already and used ffmpeg for your cameras, the GPU should be used and shown in the system tab in the frigate menu.
You can also choose to use the videocard for object detection alongside or instead of the coral. In this case you should add the following configuration:
detectors:
  coral:
    type: edgetpu
    device: pci
   tensorrt:
     type: tensorrt
     device: 0
 model:
   path: /yolo4/yolov4-tiny-416.trt
   input_tensor: nchw
   input_pixel_format: rgb
   width: 416
   height: 416
In this case we use a custom model, which you can generate yourself, but you should add this to the environment variables of portainer using the YOLO_MODELS key. Read the frigate documentation about this if you want to use this.
Troubleshooting and alternatives
Wrong timezone in frigate: this may occur when the timezone is not defined. To solve this you can go to portainer in your docker instance. Go to the frigate container and press on the name. Now choose in the actions toolbar for duplicate/edit. At the bottom of the page under advanced container settings choose ‘env’ and add a new record, with name TZ and with the key of your timezone, which you can find on wikipedia. Deploy the container and it should use the correct time.
Check temperature: if you suspect the coral has issues because of heat, you can check the temperature of the apex_0 device on the host with the following command:
awk '{printf "%.1f° Celsius\n", $1/1000}' /sys/class/apex/apex_0/tempPrivileged container not working: this tutorial was specifically for an implementation in an unprivileged environment. To make this working in a privileged container you should
USB implementation: if you want to do the same for the coral-USB you can follow roughly the same steps except all apex-device related steps are unnecessary. Also, you should use the correct bus in the lxc settings. You can check the bus with the ‘lusb’ command, for the case of bus 002 the following code is needed in /etc/pve/lxc/xxx.conf:
lxc.mount.entry: /dev/bus/usb/002 dev/bus/usb/002 none bind,optional,create=dir 0, 0
lxc.mount.entry: /dev/dri/renderD128 dev/dri/renderD128 none bind,optional,create=file 0, 0
lxc.cap.drop:
lxc.mount.auto: cgroup:rw
lxc.cgroup2.devices.allow: c 226:0 rwm
lxc.cgroup2.devices.allow: c 226:128 rwm
lxc.cgroup2.devices.allow: c 29:0 rwm
lxc.cgroup2.devices.allow: c 189:* rwm
lxc.apparmor.profile: unconfined
lxc.cgroup2.devices.allow: a
And use the following commands in the container to confirm that it is properly passed through:
apt-get install usbutils
lsusb
Instead of the apex device. Also, you can skip all steps related to the drivers, since this is not needed for the USB version. But you will have to add the device to the portainer configuration, in the same place where we added the /dev/apex_0 passthrough. Finally, the frigate configuration will also be different, since the device is usb and not pci, you need device: usb in the detectors configuration.
PCI passthrough: If you don’t want the driver to be on the host but in a VM, you can passthrough the whole device. For this, you will need to first make sure that the device is in a seperate IOMMU group:
lspci -nnk | grep 089a
find /sys/kernel/iommu_groups/ -type l
Match the ID number of the first command with the second command, where it should be at the end. If IOMMU is properly configured you can continue to blacklist the device drivers, in order to prevent proxmox from loading it on the host. Use the command
nano /etc/modprobe.d/blacklist-apex.confAnd at the following content:
blacklist gasket
blacklist apex
options vfio-pci ids=1ac1:089a
And finally run:
update-initramfs -u -k all
reboot
lsmod | grep apex
The lsmod command should print nothing at the host, which confirms that the host has not loaded the drivers.
Now you can add the PCI device to the VM you use for frigate, using the UI: VM->Hardware->Add->PCI Device->Raw Device-> Coral Edge TPU -> Add
After this you can confirm that the coral is correctly added inside the VM, using:
lspci -nnk | grep 089aNow you can follow the same steps as above to install the drivers and setup object detection.